


Photography tips for bloggers.
It’s been a while since we’ve talked photography here on the blog. Today I’ll be sharing ten photography tips with you guys and I hope you’ll find them helpful. As always, please remember that I don’t consider myself an expert and only speak from my own experience.


1. Get near a window.
This is a big one, especially on a dark, gloomy day. As I’ve told you numerous times, one of the best things that you can do to improve your photography, is to use natural light. This, however, means that the quality of your images will depend on the weather, which can be a little unpredictable, especially this time of the year. On those days when it’s really dark, I recommend that you either take your photos outside, or place your subjects on a window sill when taking your photos. If using a DSLR, you can also try bringing up your aperture (lowering your f stop) and bringing up your ISO to get a brighter image. Keep in mind that the size of the aperture has impact on the depth of field: large f stop will bring both your subject and the background into focus, while the smaller f stop (bigger aperture) will create a blurry background.


Small aperture: f/5.8

2. Invest in soft boxes.
If getting near a window doesn’t work for you, or if you’re unable to take your photos during the day, I’d recommend that you invest in a set of soft boxes. These are similar to the ones that I use and are truly a heaven-sent during winter when the days are much shorter and using natural light is limited. I used them both for photography and for filming videos and they work great. I think that they’re pretty affordable, when compared to the prices of ring lights which can be quite high.


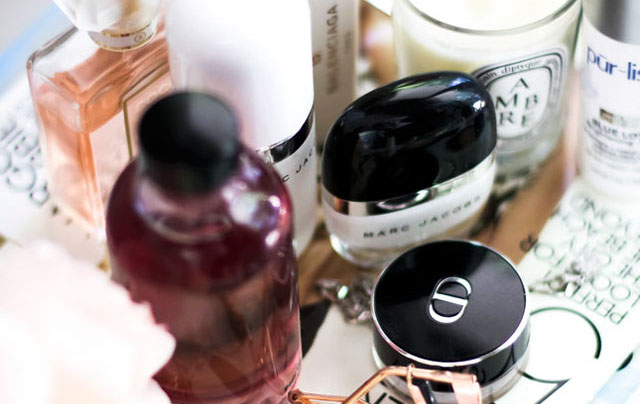
Here are some images taken using my set of soft boxes:


3. Use a reflector.
This is something that I talked about in the How to take brighter photos for your blog post. I have this 5 in 1 Portable/Collapsible Reflector and Diffuser. I use this pretty much every single day, every time I take my photos. The side which I use the most is white, which helps to bounce the light; the gold one warms up the picture, the silver will brighten it, black will block unwanted light and the translucent side will diffuse the light. This is definitely a must for me.


4. Shoot from above.
When I struggle with my composition, can’t get the picture to look the way I want it to, I always end up shooting from above. Taking flatlay style photos isn’t always easy though, especially for a beauty blogger. There are tons of subjects like lipsticks, eyeliners, mascaras, etc. that have tendency to “roll off” the surface. I sometimes like to use tape to secure them in place on my surface when taking my photos. Even lighting is definitely very important when it comes to shooting from above; you want to make sure that the light is evenly distributed in the photo and that there aren’t a lot of shadows. Getting near a window and using a white reflector will help achieve just that.


5. Avoid direct sunlight.
While shooting in direct light isn’t uncommon and can create gorgeous images, I always try to avoid direct sunlight, especially when it comes to product photography. It creates too many shadows and the images are generally too bright. I like to shoot early in the morning when the light is just perfect, and most of the time I avoid taking my photos late in the afternoon. As I already mentioned in one of my previous photography posts, the best time to take your photos is usually an hour and a half after the sunrise and an hour and a half around sunset.
These two photos were taken in direct sunlight:


This works.
6. Go manual.
If you’re still using automatic settings on your DSLR, try going manual. I know from my own experience that it can be very frustrating and discouraging at first, but practice makes perfect and can make a huge difference in the way your images look. If you want to learn more about manual DSLR settings, check out this post.
7. Adjust white balance.
Adjusting white balance is another thing that can make an enormous difference in your photos. Adjusting the white balance accordingly with your lighting situation will get the colors on your image to show up as accurately as possible. There are seven, preset white balance settings on camera: Auto– pretty much self-explanatory, this is where the camera makes a best guess each time you take a shot; Tungsten– this is often used when taking photos indoors in bulb lighting, this will cool the colors in your photos (so that they don’t come out yellow, which happens due to the yellow-toned lighting in your home); Fluorescent– this is generally used when using artificial, fluorescent lighting, as it takes out the cool, blue tones in your images and adds some warmth to them; Daylight– this mode is for shooting outdoors during normal, daylight lighting, not all cameras have this setting; Cloudy– this is for shooting on a cloudy day and warms up the subject a bit; Flash– when using flash, photos make look a bit harsh, this preset white balance setting will help to take the edge off that brightness; and lastly there’s Shade– when shooting in a shaded location, your images may look cool and blue-toned, using this setting will add pink tones to warm up the image. Most of the time, especially when shooting in natural light, I use Auto White balance and find that it works just fine. When using ring light, soft boxes or any other artificial lighting you may find that you need to adjust your white balance settings accordingly. You can also use custom white balance settings instead of the preset ones as well, just follow your camera’s manual (it’s pretty easy, all you need to do is take a picture of a white piece of paper in particular lighting setting where you’re shooting, just remember that this changes, and one custom setting will not work in every situation).
To show you an example, this is an image shot in Auto White balance in natural light:

This is the same subject shot in the same setting, with different White Balance preset options:


8. Edit.
I always edit my photos and recommend that you do the same (especially if you’re a blogger). Resizing, cropping and adjusting exposure, sharpness, etc. are few things that I always do. I have now moved to Photoshop, but few months a go I wrote a post on how to edit images using PicMonkey, find it right here.


9. Get creative.
Other than having correct settings, lighting and set up, I think that getting creative with your images is just as important. It’s great to take inspiration from others, but it’s important to add your own touch and style to your photography. I never thought of myself as a “creative” person and was always jealous for those “artsy” friends who could draw, paint or had a cool sense of fashion. It wasn’t until I found my passion for photography and cooking when I realized that I don’t need know how to paint or draw in order to be creative, you can express your creativity through anything you do, including cooking and photography. You can incorporate things like fabrics, blankets, magazines, trinket dishes, etc. into your product photography. Make sure to add your own signature to your images and make them stand out.


10. Work with what you’ve got.
Don’t we all wish we lived in a huge, bright house with enormous windows and limitless supplies of natural light? A lot of times when I’m having an off day, I get really discouraged. I’m a bit of a perfectionist and when something doesn’t go my way, if my photos aren’t bright or sharp enough, I feel like I shouldn’t post them and want to give up. It’s okay if your pictures don’t have a perfectly white background, it’s okay if you don’t have chic white walls and all your furniture isn’t made out of white marble. Work with what you already have and remember that every failure is a lesson.

If you enjoyed this post, make sure to check out other articles in the Photography category.